Who hasn’t experienced this in everyday agency life? A client’s online shop releases new products, but no one at the ads agency notices because the people responsible for product maintenance don’t communicate regularly with the various agency partners. In the end, such new products are casually mentioned at the next performance review meeting. Because we see this scenario more often than not, we’ve created a data-driven solution that conveniently displays new releases in the shop.
This article shows how to make new products from Google Merchant Center available to a group of people via Google Data Studio.
Prerequisites
For the implementation of this solution, you need:
- Read access to Google Merchant Center
- Google BigQuery
- Access to Google Ads Script / Google Apps Scripts
- Google Data Studio
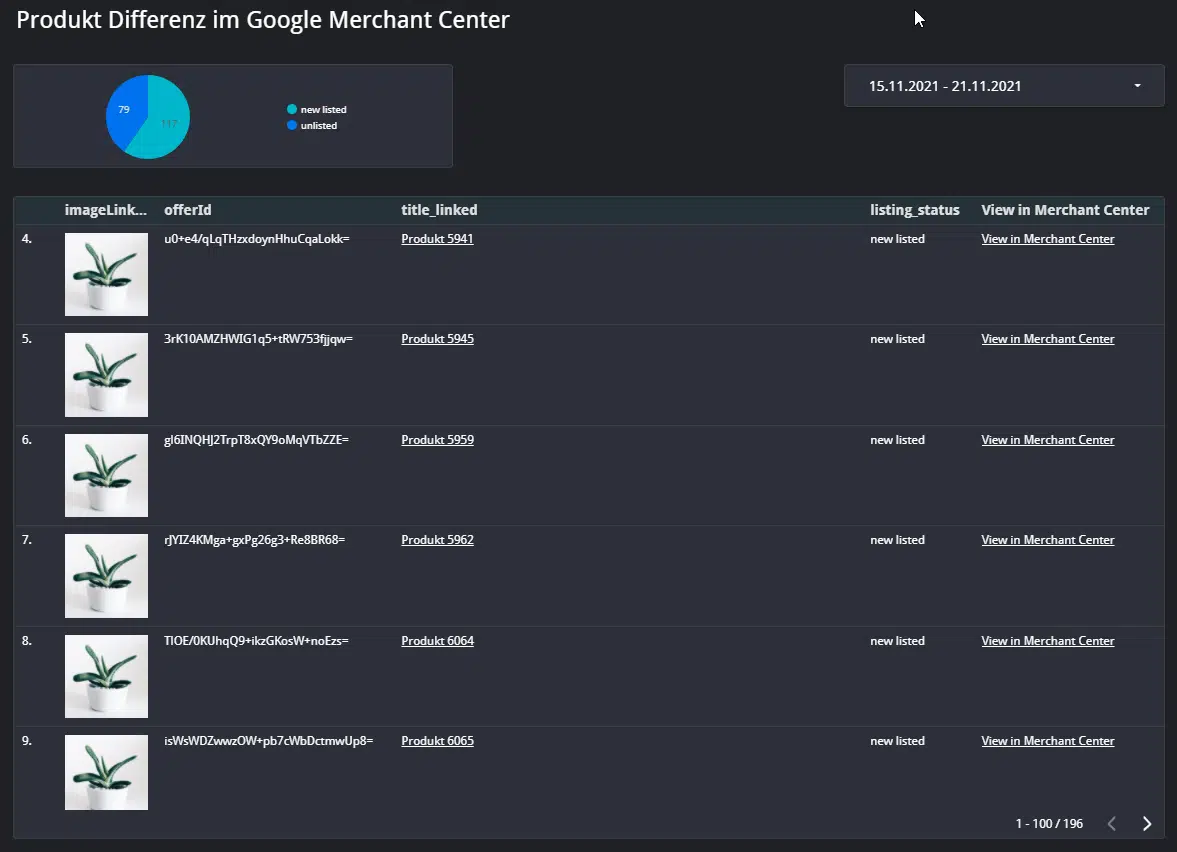
Datastudio Report: Displaying Product Difference in Google Merchant Center
The report shows all new products that have appeared in the Merchant Center during the selected period. This compares the Data Studio period control area with the previous period.
In addition, the report offers the possibility to distinguish between products that have recently been newly listed and those that have disappeared from the Merchant Center using the “newly listed” / “unlisted” chart.
The result is a real overview of the item movements in the Google Merchant Center, which can be valuable for both agency employees and the customer in product analysis.
Importing Merchant Center Data into BigQuery on a Daily Basis
To work with Merchant Center data in BigQuery, it must first be imported there on a daily basis. There are 2 approaches for this.
- With the predefined Merchant Center Data Center transfer, as detailed by Google in this article.
- With our Ads Script solution, the script addresses the current Shopping Content API and is created based on the v2.1 API.
Option 1 is the simpler one, but also has the disadvantage that the latest fields aren’t available. With the Ads script presented here, you have more control and can easily edit missing fields. This is certainly the preferred option for users with experience with Ads scripts.
BigQuery query for product differences in Google Merchant Center
WITH shopping_current AS (
  ##### GET CURRENT PRODUCTS FROM THE MERCHANT CENTER ######
  SELECT
  DATE(_PARTITIONTIME) as date,
  id,
  offerId,
  title,
  link,
  imageLink,
  fire
  FROM `webmasterei-gtm-test.gmc_data.SHOPPING_CONTENT`, UNNEST(destinationStatuses) as destinationStatuses
  WHERE DATE(_PARTITIONTIME) between "2021-11-15" AND "2021-11-21"
  AND status = 'approved' AND availability = 'in stock'
), shopping_past as (
  ##### RECOLLECT PAST PERIOD PRODUCTS FROM THE MERCHANT CENTER ######
  SELECT
  DATE(_PARTITIONTIME) as date,
  id,
  offerId,
  title,
  link,
  imageLink,
  fire
  FROM `webmasterei-gtm-test.gmc_data.SHOPPING_CONTENT`, UNNEST(destinationStatuses) as destinationStatuses
  WHERE DATE(_PARTITIONTIME) between "2021-11-08" AND "2021-11-14"
  AND status = 'approved' AND availability = 'in stock'
), unlisted AS (
  ##### Products "unlisted" brands that are no longer available in the current inventory. ######
  SELECT
  shopping_past.*,
  'unlisted' as listing_status
  FROM shopping_past
  LEFT JOIN shopping_current
  ON shopping_current.offerId = shopping_past.offerId
  WHERE shopping_current.offerId IS NULL
), new_listed AS (
  ##### Products "new listed" brands that are not yet available in the old stock. ######
  SELECT
  shopping_current.*,
  'new listed' as listing_status
  FROM shopping_current
  LEFT JOIN shopping_past
  ON shopping_current.offerId = shopping_past.offerId
  WHERE shopping_past.offerId IS NULL
), unionlist AS (
  SELECT * FROM unlisted
 UNION ALL
  SELECT * FROM new_listed
)
SELECT DISTINCT
  id,
  offerId,
  title,
  link,
  imageLink,
  fire,
  listing_status
FROM unionlist
The query first retrieves all products for the set time period. Then the same happens for the previous time period.
The data is then merged using a join, and products that were present in both periods are excluded. The data is then labeled “unlisted” or “newly listed” according to their affiliation.
Finally, the tables for the query are merged with UNION ALL.
Adjusting Time Periods for Data Studio
To operate the query in Data Studio with dynamic dates, @DS_START_DATE and @DS_END_DATE need to be added to the code.
For the period of the time range control, this is simple:
WHERE DATE(_PARTITIONTIME) between PARSE_DATE("%Y%m%d",@DS_START_DATE) AND PARSE_DATE("%Y%m%d",@DS_END_DATE)
For the previous period, things are a bit more complex.
We want to determine the period before @DS_START_DATE that is exactly as long as the period between @DS_START_DATE and @DS_END_DATE
To be able to use the data correctly later, I built this test function:
SELECT
PARSE_DATE("%Y%m%d",@DS_START_DATE) as current_start,
PARSE_DATE("%Y%m%d",@DS_END_DATE) as current_end,
DATE_DIFF(PARSE_DATE("%Y%m%d",@DS_END_DATE),PARSE_DATE("%Y%m%d",@DS_START_DATE),DAY) as datediff,
DATE_SUB(PARSE_DATE("%Y%m%d",@DS_START_DATE), INTERVAL DATE_DIFF(PARSE_DATE("%Y%m%d",@DS_END_DATE),PARSE_DATE("%Y%m%d",@DS_START_DATE),DAY) +1 DAY) as past_start,
DATE_SUB(PARSE_DATE("%Y%m%d",@DS_START_DATE), INTERVAL 1 DAY) as past_end
If you add this in Google Data Studio, you can conveniently check if the time periods are set correctly.
Here’s the finished result for the Data Studio Report:
WITH shopping_current AS (
  ##### GET CURRENT PRODUCTS FROM THE MERCHANT CENTER ######
  SELECT
  DATE(_PARTITIONTIME) as date,
  id,
  offerId,
  title,
  link,
  imageLink,
  fire
  FROM `myproject.gmc_data.SHOPPING_CONTENT`, UNNEST(destinationStatuses) as destinationStatuses
  WHERE DATE(_PARTITIONTIME) between PARSE_DATE("%Y%m%d",@DS_START_DATE) AND PARSE_DATE("%Y%m%d",@DS_END_DATE)
  AND status = 'approved' AND availability = 'in stock'
), shopping_past as (
  ##### RECOLLECT PAST PERIOD PRODUCTS FROM THE MERCHANT CENTER ######
  SELECT
  DATE(_PARTITIONTIME) as date,
  id,
  offerId,
  title,
  link,
  imageLink,
  fire
  FROM `myproject.gmc_data.SHOPPING_CONTENT`, UNNEST(destinationStatuses) as destinationStatuses
  WHERE DATE(_PARTITIONTIME) between
  DATE_SUB(PARSE_DATE("%Y%m%d",@DS_START_DATE), INTERVAL DATE_DIFF(PARSE_DATE("%Y%m%d",@DS_END_DATE),PARSE_DATE("%Y%m%d",@DS_START_DATE),DAY) +1 DAY) ## START DATE
  AND DATE_SUB(PARSE_DATE("%Y%m%d",@DS_START_DATE), INTERVAL 1 DAY) ### END DATE
  AND status = 'approved' AND availability = 'in stock'
), unlisted AS (
  ##### Products "unlisted" brands that are no longer available in the current inventory. ######
  SELECT
  shopping_past.*,
  'unlisted' as listing_status
  FROM shopping_past
  LEFT JOIN shopping_current
  ON shopping_current.offerId = shopping_past.offerId
  WHERE shopping_current.offerId IS NULL
), new_listed AS (
  ##### Products "new listed" brands that are not yet available in the old stock. ######
  SELECT
  shopping_current.*,
  'new listed' as listing_status
  FROM shopping_current
  LEFT JOIN shopping_past
  ON shopping_current.offerId = shopping_past.offerId
  WHERE shopping_past.offerId IS NULL
), unionlist AS (
  SELECT * FROM unlisted
 UNION ALL
  SELECT * FROM new_listed
)
SELECT DISTINCT
  id,
  offerId,
  title,
  link,
  imageLink,
  fire,
  listing_status
FROM unionlist
Now this query can be used in Data Studio with the help of the BigQuery Data Studio Connector. How this works is shown later in the article.
Products with Problems Warnings from Google Merchant Center
This BigQuery query shows products from the Google Merchant Center that had a problem yesterday.
For this, we only need to load the products with yesterday’s date. Then we unnest the itemLevelIssues so that we can retrieve them individually.
WITH shopping AS (
  SELECT DATE(_PARTITIONTIME) as date,
  *
  FROM `myproject.gmc_data.SHOPPING_CONTENT`, UNNEST(itemLevelIssues) as itemLevelIssues
  WHERE DATE(_PARTITIONTIME) = DATE_SUB(CURRENT_DATE(), INTERVAL 1 DAY)
)
SELECT * FROM shopping
If the query in Data Studio is set up with meaningful cross-filtering for the problems, it serves as an efficient tool to identify issues and solve them systematically.
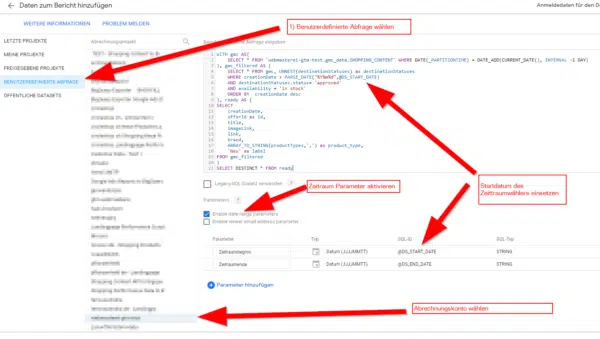
Set up a custom BigQuery report in Google Data Studio
For the Data Studio report, we use the BigQuery query shown above and set it up in Google Data Studio as a data source for the report.
- Open Data Studio report
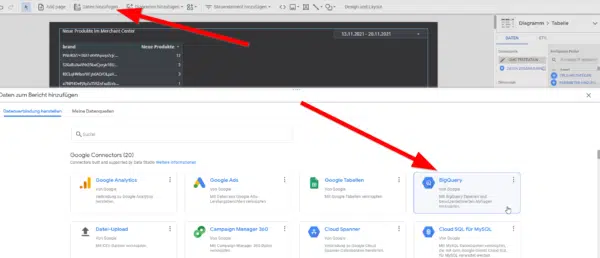
- Select ‘Add data’
- Choose BigQuery as data source
- Select custom query
- Choose billing account
- Insert query
- Set Enable Date Range Parameter = true
- Select ‘Add’
The data source is now available under “Resources > Data Sources.” There’s no luxury of assigning a name to the data source beforehand; this must be done later. The newly created data source is called “BigQuery.”
The data source is now rudimentarily ready, and you can start creating corresponding reporting tables.
The SEA team can now see which products are new, but they still have to access each product individually in the Merchant Center and use the shop search. It’s kind of… uncool – considering the Merchant Center has its own product pages and the products have their own websites. And while we’re at it… would product images work? So they don’t have to read whether it’s a jacket or a sweater?
Yes. It’s possible.
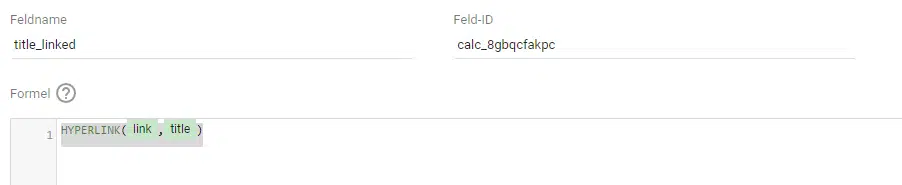
HYPERLINK() function for linking from Google Data Studio tables
One of my new favorites has become the HYPERLINK() function in Google Data Studio.
Google’s short help is:
HYPERLINK(URL, Link Label)
Examples
HYPERLINK(CONCAT(‘https://www.youtube.com/watch?v=’, External Video Id), Video Title)
Back in the data source you just created via Resources > Data Sources > Edit
You can now create a new field and use the Hyperlink function to create a linked title.
HYPERLINK(link,title)
And because it works so well, we’ll do the same for the Merchant Center page. This way, we have a field called “View in Merchant Center” that links directly to the product detail page.
HYPERLINK(CONCAT('https://merchants.google.com/mc/items/details?a=123456&offerId=',id,'-S&country=CH&language=de&channel=0'), 'View in Merchant Center')
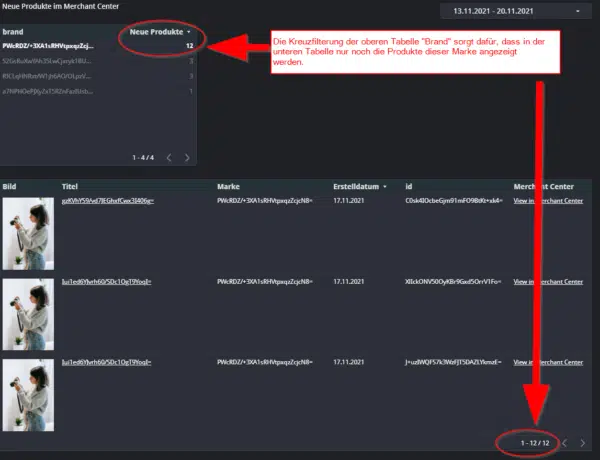
Cross-filtering in Google Data Studio
Cross-filtering in Google Data Studio offers even more value. It makes the tables interactive. If we activate this option for the brand list, clicking on a brand in the first table will cause the article table to display only articles of that brand.

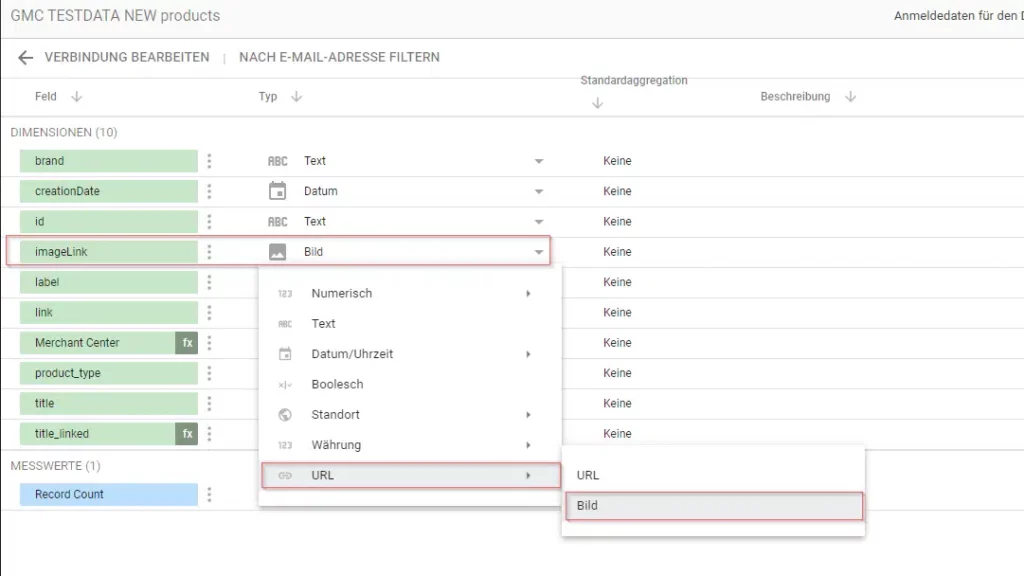
Images in Google Data Studio
Displaying images in Google Data Studio tables is very easy.
In the data source, you can define what kind of value this is. For URL values, you can choose “URL” or “Image.” We configure the image link for the reports as an image, which provides a quicker understanding of what the product is.